
These are instructions for someone who may have already dabbled with some Python programming and is now looking for a more professional setup for productive development. I'll get you started with Python package management and IDE configuration. Justification first; skip to the procedure if you're already sold.
Why PyDev
If you don't already have a favorite development environment for Python, I highly recommend using PyDev. A lot of people are still in the dark ages, using things like IDLE. Frankly, this is an outrage. If you are one of these people, please install PyDev.
Just the use of the Eclipse editor alone will make for a much nicer programming experience. I get mad when I'm working outside of a proper editor (vim and emacs are not proper editors, and neither is IDLE). Managing your application launch configurations is another convenience that seems so minor you don't appreciate how useful it really is. But most of all, the biggest win in using PyDev is the debugger. The debugger is absolutely invaluable and if you haven't been using it, you are de facto terrible at debugging. Sorry to break it to you.
So please do take the time to set up a proper IDE. The only one better than PyDev is PyCharm. The only reason I don't use PyCharm is it costs money (until now!).1 Another possible alternative (if you do one-off, experimental scripts for science or research) is the IPython Notebook. I have no experience with either of these so I can't talk too much about them.
Why Virtualenv
You should also take the time to properly quarantine the dependencies for different projects. Chances are, if you've been using Python already then you're already familiar with the pip package manager. You may or may not be using virtualenv, however.
Here's the short version: pip lets you install packages (Python libraries). Usually, you do not want to install packages globally, for the entire system, because they may conflict with each other. Instead, you want each Python project you create to have its own isolated ecosystem. Virtualenv provides this isolation. Virtualenvwrapper makes virtualenv nicer to use.
Even if you're not worried about conflicts, virtualenv can help you make sure your demo still works years from now (especially important if you care about reproducible research). The fact is that libraries aren't always perfectly backward-compatible or bug-free. You may upgrade a package and find that it breaks your project. The more time passes since you last ran a piece of code, the more likely it is to be broken. Using a virtualenv to freeze the dependencies is a safeguard against this problem.
For a more detailed introduction to these tools, I found this blog post useful.
The Procedure
-
First, install pip. The best way is with the get-pip.py script from the instructions provided here. If you use Homebrew on OS X, it might even come already installed—I'm not sure—you can use $ which pip on the command line to check (if you get no output, it's not installed).
- Install virtualenv and virtualenvwrapper in one go. It's as easy as:
1$ sudo pip install virtualenvwrapper
See here for more details. -
Install Eclipse (any version—I recommend Eclipse IDE for C/C++ Developers or Eclipse IDE for Java Developers). This is straightforward, unless you're on Linux, in which case it's stupid retarded.
Linux users: If you install through a package manager, you'll probably get a version that's way too old. You can simply download the binary, but then it doesn't get properly installed on your system. If you're on Ubuntu, you can fix this by following the instructions here or by using this handy little script.
-
Now install PyDev from this Eclipse Update site: http://pydev.org/updates. More detailed instructions can be found here.
-
Now you need to configure PyDev to point to your new virtualenv. This is done by adding an interpreter under Preferences... > PyDev > Interpreters > Python Interpreter. You should also set up interpreters for your base installation of Python. This can be done automatically using the Auto-Config buttons. To add an interpreter for your virtualenv, you will instead need to click the New... button and Browse... for the Python executable. Under a typical setup, the location would be ~/.virtualenvs/<venv-name>/bin/python. In both cases, the appropriate libraries should be selected automatically, so leave them as they are.
OS X Users: If you follow those instructions you'll get a big, fat warning message, like this:
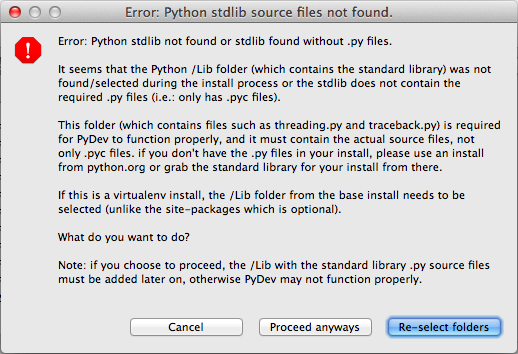
In my experience, it runs fine anyway. However, the in-editor parsing will be missing all your system libraries, so it will show you errors where in reality there are none. To fix this, you should select all libraries when you set up the interpreter:
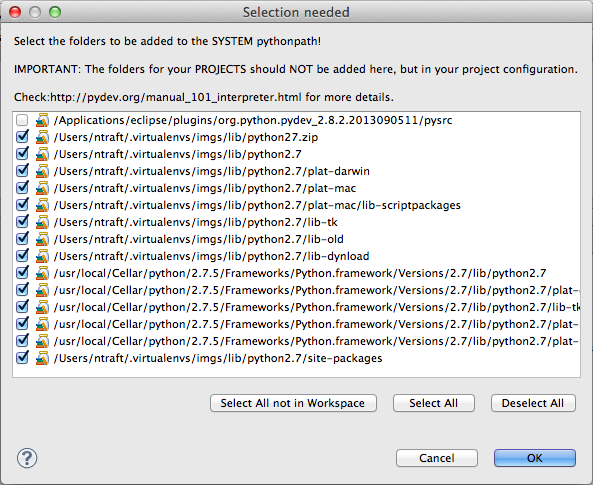
The only problem with this is that I'm not sure how that affects your PYTHONPATH at runtime. If you have some libraries installed globally that conflict with the ones in your virtualenv, you may run into problems. So far I haven't had any issues. Let me know if you have more info on this.
-
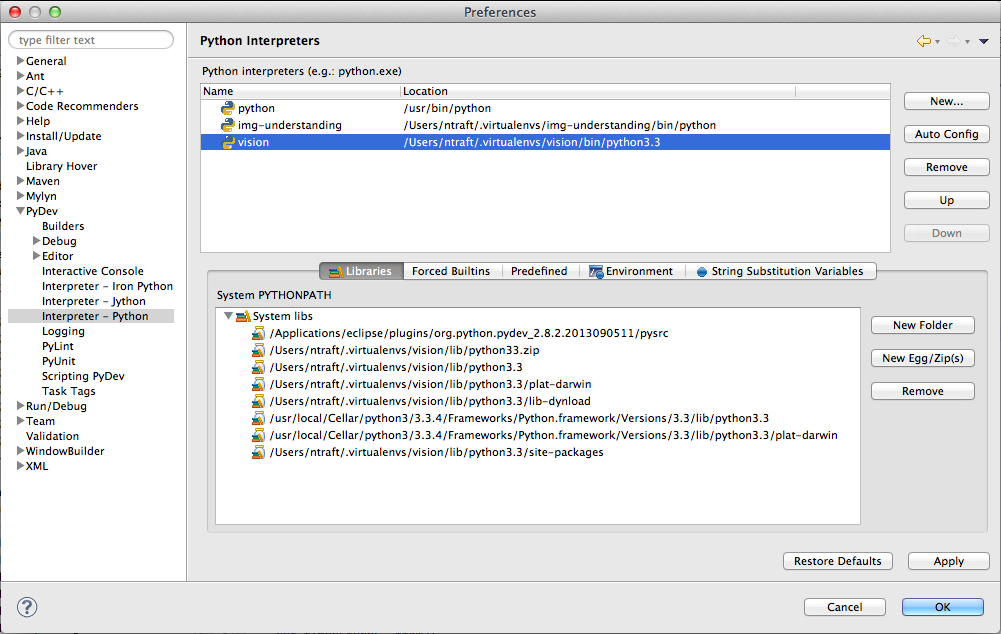
After setting up your interpreters, you should see something like this:
-
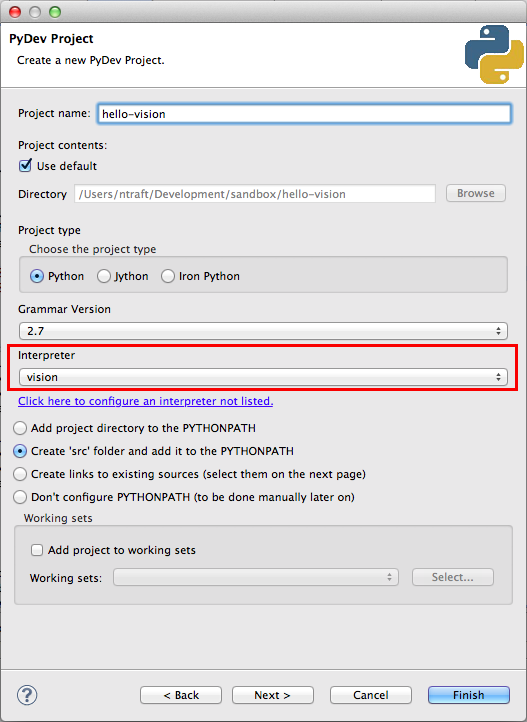
If you already have a PyDev project you can now configure the project to use this interpreter. Or, you can create a new project:
-
If you later install additional libraries, you will need to go back to the interpreter definitions, click "Apply", and tell Pydev which interpreters it should scan again. Until you do that, PyDev might not notice your new libraries. For more information, see this post.
...And you're locked and loaded for Python development! Go get 'em!
- While writing this post I discovered that PyCharm now has a free version! You can bet that I will be switching over very soon! I have extremely high regard for all the JetBrains IDEs. In my opinion, these guys can do no wrong.
The only thing that may make me hesitate to switch is the fact that I may sometimes need to develop partly in C++, and there is not yet a JetBrains C++ IDE. They're working on it (which makes me very excited!) but they've still got a lot to do (which makes me very sad-face).
thanks
Nice one dude! I appreciate the effort, happy face...lets see now
Yeah, it worked, nicerdicer!
Thank you very much. I followed your instructions on my Mac with OS X 10.10.2 and Eclipse Kepler Release 1 and it worked without a any problems, bugs or exceptions. Ran an existing 300 line program and it worked fine. Nice job.
Well, this might be retarded question, but I'm a total newbie and this is driving me insane... where I'm supposed to type '$ sudo pip install virtualenvwrapper' ? I'm a Windows user.
You type it in the "command line", or "shell", or "terminal". Go to Applications > Utilities > Terminal.app, or just open Spotlight and search for 'terminal'.
You type it without the dollar sign '$'. I just use the '$' to tell you it's a shell command. Other blogs also use this convention (or '#' to tell you it's a shell with administrator [or root, or superuser] privileges).
Btw, whenever you precede a command with 'sudo' you will be asked for your password (short for "superuser do", the equivalent of executing something with "Administrator Privileges" on Windows). Whenever you get errors complaining about "permissions", you can usually squash them by re-running the same command with 'sudo'.
Okay I should stop there b/c to learn anything more you should really read a primer on "bash" or Linux.
Welcome to Unix. Welcome to freedom from the oppression of endless GUIs. ;-)
Okay... If I understand it correctly, those commands above are to be used in terminal in Linux/Unix, not the terminal in Windows (I tried using them before, with and without $ sign, but Windows terminal only produced complains)? I found a tutorial on YouTube and managed to install virtualenv via Windows PowerShell and commands looked different. Is that right?
OHHHHH sorry I thought you had switched from Windows to Mac. My bad.
I have no idea how to install virtualenv on Windows. The part of this post that will apply to you is everything after step 2. Up to that, yeah, do it whatever way they tell you, whether it's GUIs or PowerShell or anything else.
thank you very much
Thank you
It was clear. I used you post to set it up over Ubuntu 17, and Eclipse Neon and runs great. I